Building a micro-server
2026-08-27
Why build one?
I’ve been wanting to build a micro-server for some time now, for several reasons:
- Move routing functions to a more reliable, secure, and easily upgrade-able platform.
- My current (pico?) server is almost at bursting point, in terms of storage, and it’s an old platform (32-bit). So it’s end-of-life from a hardware point of view.
- Build a larger file-server, naturally, and preferably, one with RAID for redundancy, and data security.
There are some things I like about my current, (pico-) server, which I don’t really want to give up!
- Very low power usage (10-12 watts).
- Silent (fan-less).
However, there are also a few things that I want to achieve with this upgrade:
- Upgradeable storage – so I’d want space for at least 4 drives.
- Better network throughput – so perhaps by bonding two interfaces on the router for a load-balanced interface.
- Stronger security:
- DNSSEC would be nice to achieve as part of this upgrade.
- A stronger (as well as easier to manage) firewall configuration.
- Better network separation, for a guest and an internal network.
As a consequence, it should be possible to retire my current, main router – an Archer C7 running OpenWRT.
Network Topology
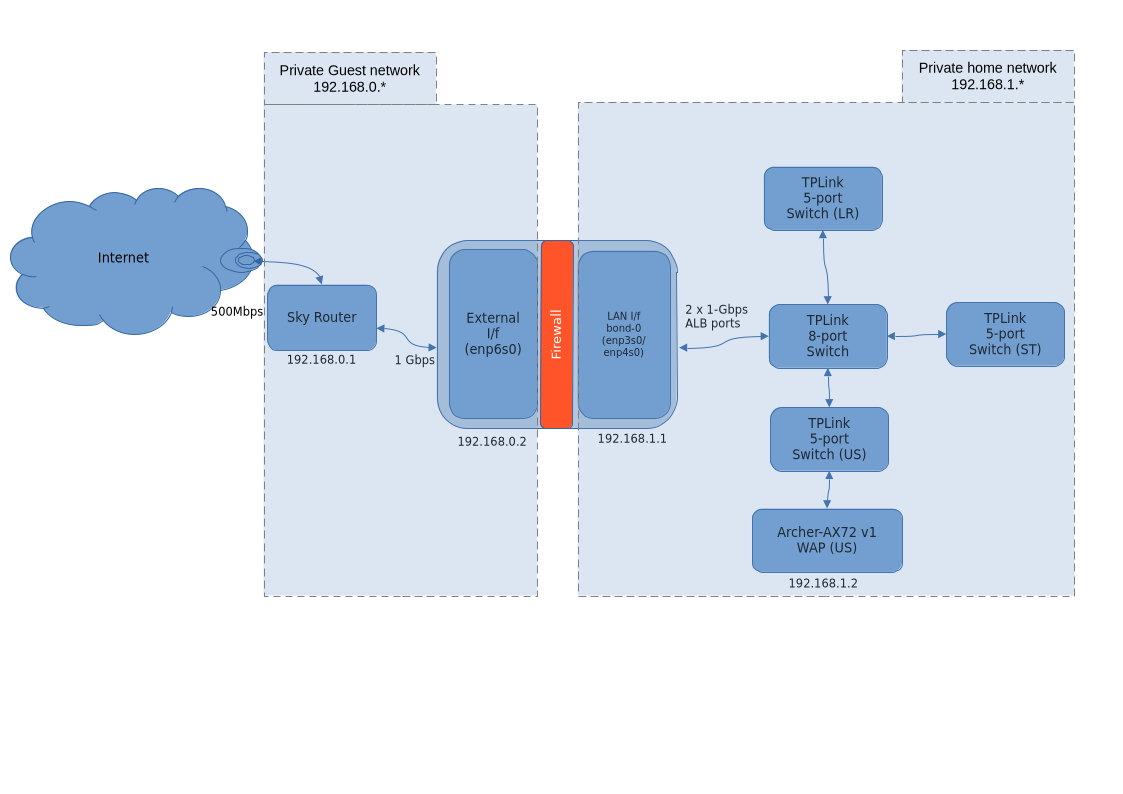
The network topology looks like this:
The build
Hardware components
The micro-server component list follows:
| Component | Price | Notes |
|---|---|---|
| Case – ThermalTake | £35.74 | Supports 2 x 3.5” disks and 2 x 2.5” disks (stodgily mounted!) |
| Very well ventilated | ||
| Comes with fan mounted at front that I’ve disconnected and has a lot of space for more fans. But it’s so well ventilated, I’ve not connected any! | ||
| Motherboard – mini-ITX – ASRock J4105 quad-core Celeron board | £115.92 | 4 SATA 6 Gbps data channels |
| 1Gbps ethernet port | ||
| Passively cooled Celeron J4105 | ||
| Lets be realistic – this processor will not break any speed records! But, for the functions it’s being used for, it’s honestly overpowered. It barely breaks a sweat. And i’ts very low power – always between 12-18w. | ||
| RAM – Crucial – 4GB x 2 (DDR4) | £31.97 | |
| Storage | Total storage cost: £241.42 | |
| 1 x 4TiB Seagate Barracuda disk (3.5”) | £87.41 | btrfs RAID-1 data drive (paired with the second 4TiB drive) |
| 1 x 4TiB WD Blue | £85.89 | btrfs RAID-1 data drive (paired with the 4TiB drive above) |
| 1 x 256GiB Crucial SSD | £68.12 | OS and home drive. Really, just the OS and minor home data. All other data is on the shared area provided by the 4TiB btrfs storage |
| Second NIC – RealTek dual-NIC PCI-express card | £ 16.97 | |
| Power-supply – Pico-PSU 80W | £21.85 | |
| DC power adapter – DTK | £14.99 | |
| 1 x black 2-gang electrical blanking face plate | To cover up the gaping hole behind the case intended to fit a PSU – also to mount the adapter plug socket | |
| Total cost | 35.74 + 115.92 + 31.97 + 21.85 + 14.99 + 16.97 = £237.44. Total including storage: 237.44 + 241.42 = 478.86 | For a total outlay of £478.86, the overall costs are quite reasonable considering the value provided by the server |
Software components
| Function | Component |
|---|---|
| Router | ISC BIND-9 |
| ISC DHCP | |
| firewalld | |
| File-share | sftp |
| UPS – APC Back-UPS ES 850G2 | apcupsd |
| Alerting (email) | postfix |
| Library | Calibre |
| DVCS | git |
| Web Console | Cockpit |
The server provides the following functions currently:
- Routing functions – implemented via ISC BIND-9, ISC DHCP and firewalld.
- File-server – implemented via sftp.
- A web-server – provided by Apache httpd
- Digital book library – provided by Calibre
- A DVCS – provided by git and backed up at Codeberg.
The routing function allows complete, physical separation of the guest network and the internal home network, allowing untrusted devices to be assigned to the guest network, and only trusted devices assigned within the private home network.
The SFTP based file-server is fully locked down (SFTP account has no shell), allowing key login only, and providing for secure file access from anywhere (even on external public networks).
The Calibre digital book library provide book download ability from
anywhere via the httpd reverse-proxy.
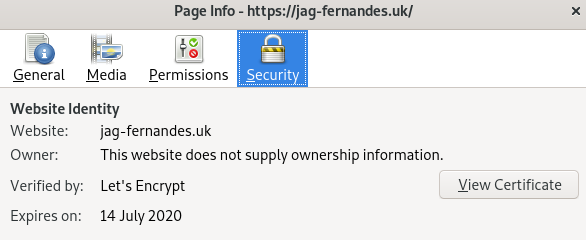
SSL certificates are provided by Lets Encrypt, allowing secure access to content.
The server is on an APC Back-UPS ES 850G2, providing backup power for up to an hour, in case of power failures. Although the house is also on solar power with battery backup that provides up to a day of power on a fully charged battery.
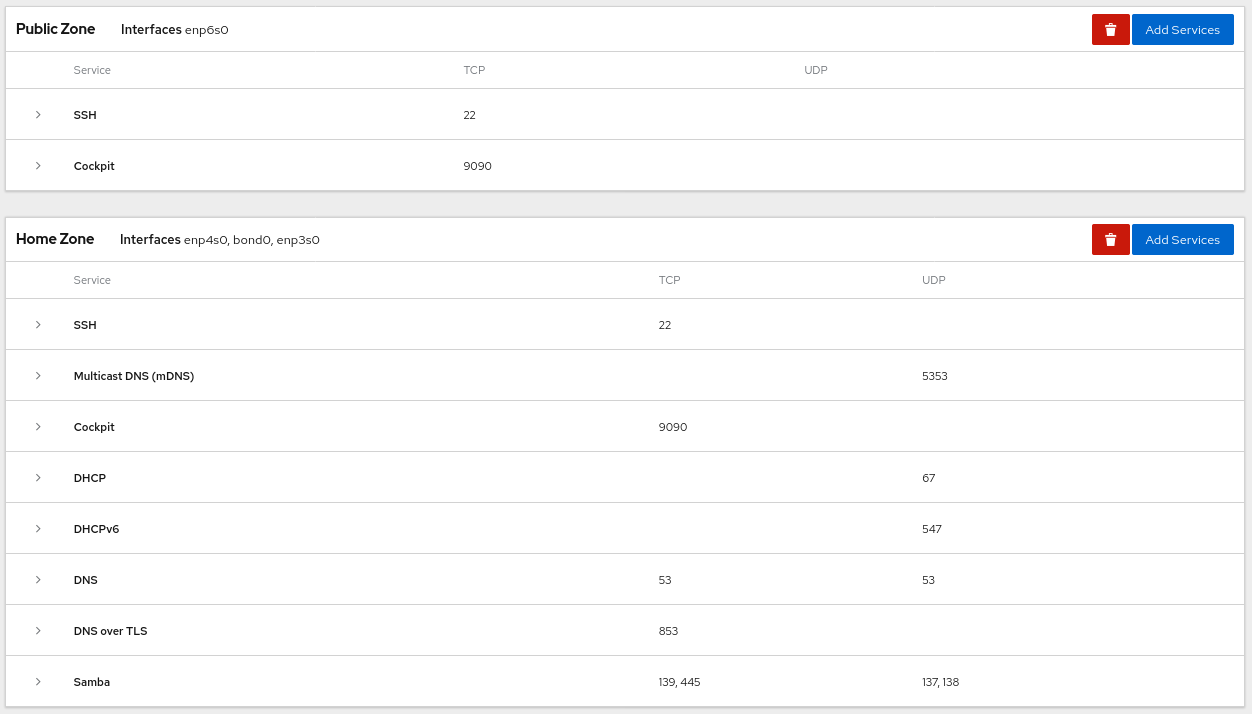
Firewall zones
Firewall function is provided by the default Fedora firewalld. The basics are documented here. Full configuration is on my personal git repository (private/not world visible).
🛈 A note about GitHub and LLMs
I’ve moved all my personal projects, including the server configuration repository, to this server, with a backup on Codeberg. The reason for this move is almost all other public git repository services (GitHub, GitLab) are open to LLM training. I don’t personally see the point of encouraging or supporting LLM training on the work I do, which typically tends to be cutting edge research & development of Java distributed applications that demand high scalability and data-throughput. This is a niche area. The LLMs can’t really help as I’m usually working with the highest available versions of most components. And I’m pushing boundaries not commonly useful to most people. Given this situation, I don’t see why I should be a training bed for any LLM service provider for free!
Codeberg has a clear no LLM policy – therefore the choice.
Installing DHCP
The DHCP service provides dynamic host IP assignment. This service isn’t installed by default – you must install, configure and then enable it.
You can install it by running the following command:
sudo dnf install dhcpFull configuration is on a private git repository, but an excellent guide can be found here.
Once configured, start it and test it:
sudo systemctl dhcpd startCheck the logs:
journalctl -ab -u dhcpdIf everything is ok, you should see clients on your network getting leases.
Once confirmed working, enable the service so it comes up on reboots.
sudo systemctl enable dhcpdThat’s it – the service should now be active and working. You should test it by connecting directly to the server with an ethernet cable, and ensuring you can get an IP leased to you.
Setting up DNS
For DNS I’ve gone back to BIND-9 – I’ve found it far more reliable and robust than dnsmasq.
Again, these instructions cover DNS setup as well – and they’re really excellent.
🛈 Why not dnsmasq?
dnsmasq is a very popular DNS/DHCP server used by most off-the-shelf routers, including OpenWRT. So why do I not use it?
Well, in a previous iteration, I did use dnsmasq. But found it conflicts with the dnsmasq used by systemd-networkd, and does not integrate cleanly with systemd services – I had to set it up to wait for the bond to start up, for example. So this time, I’ve used ISC BIND-9 and ISC DHCP to provide DNS and DHCP service for the LAN. This works perfectly on Fedora server – there are no problems in waiting for the bond interface to come up.
Add the DNS and DHCP services to the LAN side of the Firewall. Ensure you turn off any services that you don’t need exposed on the Public interface of the Firewall.
Setting up IPv6 routing
🛈 I have disabled IPv6
….on the ISP router on the home side for simplicity and stronger network isolation.
Renewing Lets-Encrypt HTTP certificates
Renewing the Lets-Encrypt certificate is a little bit obtuse, as it needs you to set the web-root, otherwise, it will fail with an obscure error.
You will get an email reminder when your certificate is due to expire. At that point, you should:
- First enable HTTP on your firewall, on the external network interface. Lets-encrypt requires HTTP access to verify your domain, so without this, renewal will fail.
- Run the following command – note that you need to specify the web-root, otherwise the renewal script will fail:
sudo certbot renew --webroot --webroot-path /var/www/htmlThis will renew your certificates, and you’ll be all set until it’s time to renew again. You should check this on your browser to verify the certificate:
Setting up a WiFi Access Point
🛈 Note
This section is no longer in use and hasn’t been updated for a considerable time. I now simply use a standard WAP for WiFi within my internal home network.
I also got an Intel AX-210 WiFi-6 card with a view of upgrading my WiFi to WiFi-6.
Setting this up was not as easy as I’d expected though. While it turned out to be easy enough in the end, the documentation on the interwebs is quite spotty and cover different usage scenarios. So don’t really apply directly to a general-purpose home router WiFi AP setup.
The first thing to bear in mind is this: the NetworkManager “shared” profile is a way to “share” the current WiFi connection to other clients. This is actually not what you want – as a general-purpose router AP needs to share its external internet connection with other clients.
You therefore want a manually configured WiFi connection, and it should be added to the same internal Firewall zone (the home zone, in this case).
Additionally, you need this WiFi connection to be setup on its own subnet, but to use the existing DNS and DHCP services already advertised on the router. For this to work, you need to:
- Add the WiFi subnet (192.168.3.0/24) to the DHCP server configuration, as a new subnet that this server must also serve IP/name reservations/mappings on.
- Then add this WiFi subnet to the DNS server interface definition so that it knows it needs to serve DNS queries on the WiFi interface as well.
- At this point, you may also add client mappings and DNS A records, for internal network name resolution.
And now, your new WiFi AP should work.
NetworkManager WiFi AP setup steps
You’ll need to run the following commands to get a WiFi AP setup in NetworkManager, before setting up the DNS/DHCP configuration.
sudo nmcli con add type wifi ifname wlp5s0 con-name HomeAP-WiFi6
autoconnect yes ssid <gnaf@ax210>
sudo nmcli con modify HomeAP-WiFi6 802-11-wireless.mode ap
sudo nmcli con mod HomeAP-WiFi6 802-11-wireless-security.pairwise ccmp
sudo nmcli con mod HomeAP-WiFi6 802-11-wireless-security.group ccmp
sudo nmcli con mod HomeAP-WiFi6 802-11-wireless-security.proto rsn
sudo nmcli con modify HomeAP-WiFi6 wifi-sec.key-mgmt wpa-psk
sudo nmcli con modify HomeAP-WiFi6 wifi-sec.psk '...'
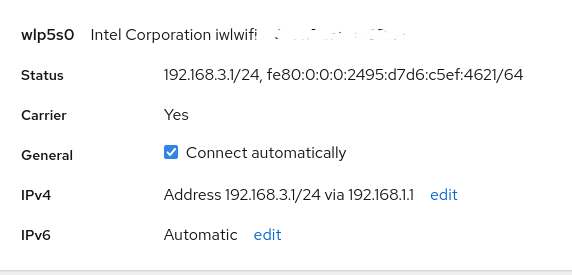
You’ll then need to setup the new interface on the Cockpit UI. Set the type to Manual, set it’s IP to be a different subnet (e.g. 192.168.3.1), and set the gateway to be the main router IP (e.g. 192.168.1.1). These should be the settings:
You now have to add a subnet configuration in the DHCP configuration.
##################################################
subnet 192.168.3.0 netmask 255.255.255.0 {
## Static IP reservation pool
# pool {
# deny unknown-clients;
# range 192.168.1.1 192.168.1.99;
# }

## Dynamic IP range
pool {
    allow unknown-clients;
    deny known-clients;
    range 192.168.3.100 192.168.3.254;
}
## Broadcast address
option broadcast-address 192.168.3.255;
## Router for this subnet (this server)
option routers 192.168.3.1;
## Subnet mask
option subnet-mask 255.255.255.0;
## Interface MTU
option interface-mtu 1452;
}
🛈️ Note
As noted above, dnsmasq is no longer in use.
And also add this subnet to dnsmasq so it knows it must serve this subnet as well.
Add the interface to the configuration file:
interface=wlp5s0

listen-address=127.0.0.1,192.168.3.1
Then also add the WiFi port to DNS:
## athena-wifi
address=/athena-wifi.home.lan/192.168.3.1
ptr-record= athena-wifi,192.168.3.1
And that should complete the setup.
Restart named and dhcpd, and then bring up
the WiFi AP.
sudo systemctl restart dnsmasq
sudo systemctl restart dhcpd
sudo nmcli con up HomeAP-WiFi6
That should be it! You should now be able to connect to the internet via the new WiFi AP.
Addendum
Well, you’d have thought that was that. Unfortunately, the Intel AX 210 firmware doesn’t allow it to work on 6GHz band in the UK. Nor does it allow wider bands on the 5GHz band. As a result, the whole experiment of adding a WiFi card to the server to offer a WiFi access point that I could control/upgrade at will etc, failed.
I have instead got an Archer AX72 router that offers WiFi-6 in the 5GHz band. The AX-210 M2 card has now been moved to my main laptop – a HP Z-Book G7. I can now drive the laptop at my rated broadband speed of 500Mbps, from the same room. WiFi-6 is great though – with smart positioning, I can get 400Mbps at the back of the house!
This is quite amazing! WiFi-AC on 5GHz gave me almost no coverage at the back of the house.
I’ve moved the Archer-C7 (AC router) to my sons room upstairs. The combination gives me excellent 2.4GHz coverage throughout the house – no dead spots! And the WiFi-AX router gives me excellent range and bandwidth across most of the house – good enough to work from anywhere, and use Zoom calls with video, anywhere in the house.
Some notes about the Archer C7
🛈 Note
The Archer C7 is no longer in use – it has been replaced by the Archer AX72. OpenWRT is also no longer in use. In my experience, OpenWRT, while a great project, suffers from backporting ( it does not use the latest kernel) and hardware compatibility problems (many new routers are not supported for a while). The situation has improved considerably in recent times, and I hope to one day be able to go back to OpenWRT for my home network WAP. However, since my server provides much of the functions OpenWRT used to, whilst also running a standard server distribution, therefore enabling an always up-to-date software stack, the need for OpenWRT is significantly reduced. I do not have to trust the ISP router or the internal home network WAP anymore. All security functions have moved into my server.
The Archer C7 unfortunately is running on an older version of OpenWRT (OpenWrt 18.06.2). For some reason it insisted on retaining its IP (192.168.1.2) which I wanted to re-assign to the Archer AX72. This was quite problematic and in the end I had to SSH onto it and set it by the command-line.
uci set network.lan.ipaddr=\'10.0.0.1\' ; uci commit network ; service network restart🛈 SSH connectivity to OpenWRT
SSH was another issue – it runs an older version of OpenSSH, and I had to setup the SSH client to allow ssh-rsa to access this server.
This required editing the file: ~/.ssh/config and
setting the host to accept SSH RSA:
Host 192.168.1.2
User root
PubkeyAcceptedAlgorithms +ssh-rsa
HostkeyAlgorithms +ssh-rsa